


This post is the third of a multi-part series where I'm exploring the use of Bluetooth Low Energy along embedded Rust on the ESP32. Information in this post might rely on knowledge presented in past posts.
Introduction
In the first two posts of this series, we've dealt with activities conducted pre-connection establishment. This included a central device scanning for advertising peripheral devices (BLE Scanner) and a peripheral device advertising its presence to central devices (BLE Advertiser). In this post, we want to transition to the post-connection phase. This means that a connection needs to be established first, and then the connected devices assume the roles of server and client when exchanging data. In this case the devices can start exchanging data in the form of what is known as attributes.
In this post, we're going to create a peripheral device that will assume the role of a server upon connection establishment. Similar to past posts, the code will be built using the esp32-nimble crate.
📚 Knowledge Pre-requisites
To understand the content of this post, you need the following:
Basic knowledge of coding in Rust.
Familiarity with standard library development in Rust with the ESP.
Basic knowledge of networking layering concepts/stacks (ex. OSI model).
Basic knowledge of Bluetooth.
💾 Software Setup
All the code presented in this post is available on the apollolabs ESP32C3 git repo. Note that if the code on the git repo is slightly different then it means that it was modified to enhance the code quality or accommodate any HAL/Rust updates.
🛠 Hardware Setup
Materials
-
🔌 Connections
No connections are required for this example.
👨🎨 Software Design
🔗 Connection Establishment & Management
Once a central decides to connect to a peripheral, it would send a connection request to the peripheral. The peripheral would in turn accept the connection and establish a bi-directional communication channel between the two devices. Once a new connection is established, new connection settings/parameters are involved to manage the connection. Notice how in terms of connection management, we are still using the peripheral and central roles. Some important settings include the following:
Connection Interval: Recall scan intervals in the pre-connection phase. This is a similar concept, albeit post-connection. The connection interval defines how often the central device communicates with the peripheral device. A shorter connection interval allows for more frequent communication, resulting in lower latency but higher power consumption. Conversely, a longer connection interval reduces the frequency of communication, resulting in higher latency but lower power consumption. The lower power consumption is a result of the devices going to sleep after all needed packets are exchanged.
The connection interval is typically negotiated during the establishment of a connection, but can also be updated during a connection. It is specified in units of 1.25 milliseconds, with allowable values ranging from 7.5 ms to 4,000 ms (or 7.5 ms to 4 seconds).
Within a connection interval, there also exists connection events. A connection event, triggered by a central sending a packet, marks the exchange of data between devices to either synchronize their clocks and/or communicate data.
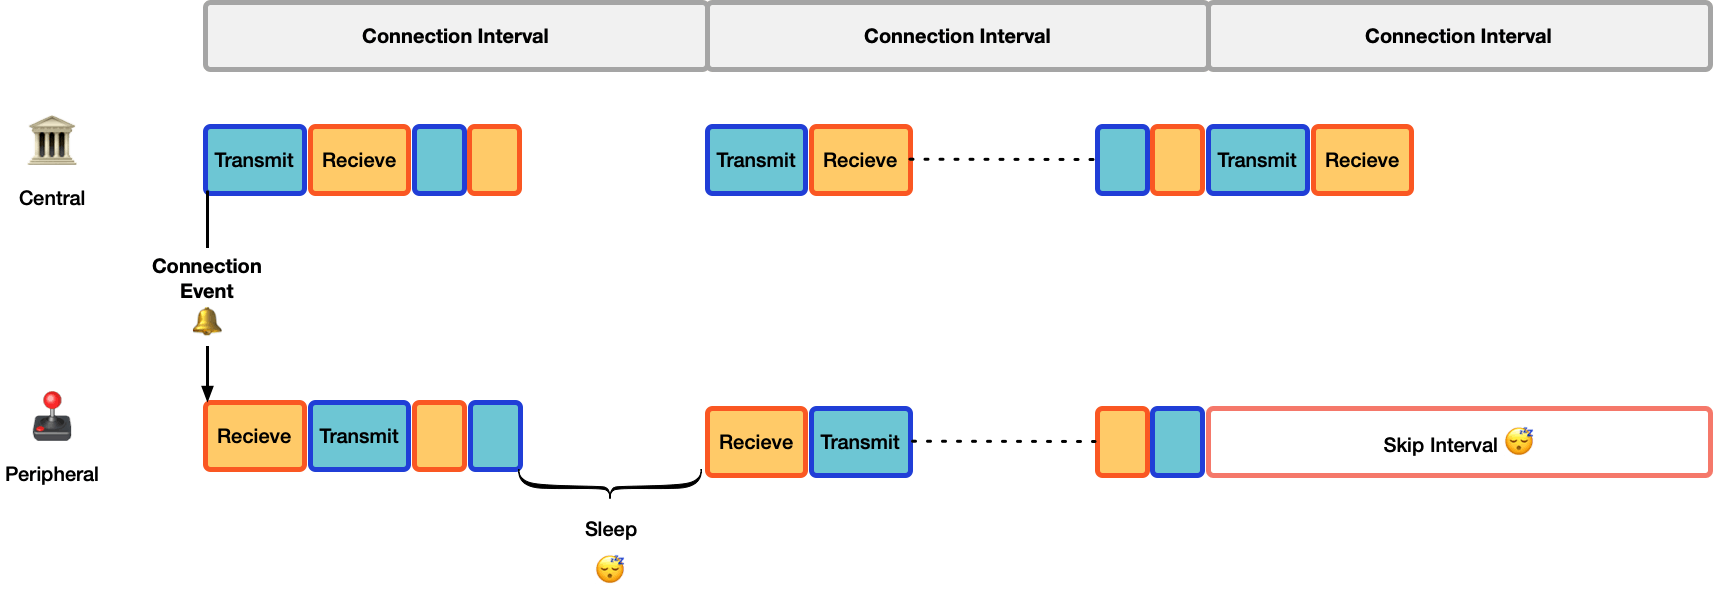
Peripheral Latency: This allows the peripheral device to skip a certain number of connection events (intervals) if it has no data to transmit. This also allows the peripheral to conserve power by entering a low-power mode between connection events. One way of viewing this is extending the connection interval when theres no data to share.
Supervision Timeout: This limits the duration of inactivity before the connection is considered lost. If the peripheral has no data to transmit for a prolonged period exceeding the supervision timeout, the connection may be terminated by either the peripheral or the central device.
🔃 Data Exchange
This is the phase where the devices assume client and server roles. The meaning of these roles is similar to the context of regular networking. A server is a data provider and a client is a data requestor. While a central role often aligns with a client role and a peripheral roles often aligns with a server role, thats not always the case. Pre-connection roles are not tied to post-connection data exchange roles. Meaning that a peripheral or central device can dynamically switch between data exchange roles, allowing a device to act either as a client or a server as needed.
In a BLE connection, all data is exchanged through attributes. An attribute itself is a data structure and is the basic building block forming larger data structures defined by the GATT layer like services and characteristics (more next). An attribute can simply be viewed as a shared variable between two devices that both can modify. Why is this necessary? one might wonder. Meaning that, we could have exchanged data purely through attributes. Interoperability is one of the main reasons. By defining standardized services and characteristics, BLE devices from different manufacturers can communicate and interoperate seamlessly. This promotes compatibility and allows for the creation of diverse ecosystems of BLE devices and applications.
There are several GATT layer operations that can modify attributes. These operations are split into client-initiated and server-initiated, depending on the source triggering a data exchange operation. Here are the main GATT operations:
Read: This is a client-initiated operation. This operation allows a client device to retrieve the value of a characteristic from a server device. The client sends a read request to the server, and the server responds with the current value of the characteristic.
Write: This is a client-initiated operation. This operation allows a client device to set the value of a characteristic on a server device. The client sends a write request containing the new value, and the server updates the characteristic value accordingly.
Write Without Response: This is a client-initiated operation. Similar to the write operation, this operation allows a client device to set the value of a characteristic on a server device. However, unlike the write operation, the write without response operation does not require an acknowledgment from the server. This can be used for faster data transmission when acknowledgment is not necessary.
Notify: This is a server-initiated operation. This operation allows a server device to send notifications to a client device when the value of a characteristic changes. The client subscribes to notifications for a specific characteristic, and the server sends notifications whenever the characteristic value is updated.
Indicate: This is a server-initiated operation. Similar to notifications, this operation allows a server device to send indications to a client device when the value of a characteristic changes. However, indications require acknowledgment from the client, ensuring reliable delivery of data.

🛎️ Services & Characteristics
As mentioned earlier, the basic building block in BLE is an attribute. As such, both services and characteristics are special types of attributes reserved to provide some structure in the data exchange process.
Services are a type of attribute that represent a collection of related data or functionalities offered by a BLE device. Each service is identified by a unique 16-bit or 128-bit Universally Unique Identifier (UUID). Services typically contain one or more characteristics and define the capabilities of the device. Services act as containers for characteristics and provide a logical grouping for related functionality.
Characteristics are another type of attribute that represent individual data elements within a service. Each characteristic has its own unique 16-bit or 128-bit UUID as well within the context of its parent service. Characteristics define specific pieces of data or operations that can be performed, such as reading a sensor value or writing a configuration parameter. Characteristics have properties that define how they can be accessed and manipulated, such as read, write, notify, and indicate (GATT Operations).
There also exists descriptors which are additional attributes that provide metadata or additional information about a characteristic. Descriptors are optional and can be used to specify characteristics' properties, permissions, and user-friendly descriptions. Descriptors like all other attributes also have their own unique 16-bit or 128-bit UUID. Descriptors provide context and additional details about characteristics, enhancing their usability and interoperability.
Lets take an example. Say we want to create a BLE-enabled fitness tracker which part of it tracks the heart rate. One service could be a heart rate service that would encompass heart rate-related functionalities. This type of service could have several characteristics, one could be a heart rate measurement characteristic and another would be a body sensor location characteristic.
The BLE standard provides a lot of standard services for common applications to leverage in designs. However, we are not mandated to use any of them. We can actually create our own services and characteristics to exchange data which is what we'll be doing in our example. To exchange data though, a device should have at least one service that encompasses at least one characteristic.
In our example we'll be creating a peripheral server with one characteristic that can be read from or written to.
👨💻 Code Implementation
📥 Crate Imports
In this implementation, the following crates are required:
The
esp_idf_halcrate to import delays.The
esp_idf_syscrate since its needed.The
esp32_nimblecrate for the BLE abstractions.
use esp32_nimble::{uuid128, BLEAdvertisementData, BLEDevice, NimbleProperties};
use esp_idf_hal::delay::FreeRtos;
use esp_idf_sys as _;
🎛 Initialization/Configuration Code
1️⃣ Obtain a handle for the BLE device: Similar to the pattern we've seen in embedded Rust with peripherals, as part of the singleton design pattern, we first have to take ownership of the device peripherals. In this context, its the BLEDevice that we need to take ownership of. This is done using the take() associated method. Here I create a BLE device handler named ble_device as follows:
let ble_device = BLEDevice::take();
2️⃣ Create an Advertiser Instance: After initializing the NimBLE stack we create an advertiser instance by calling get_advertising, this will create a &Mutex<BLEAdvertising> instance. Heres the code:
let ble_advertiser = ble_device.get_advertising();
3️⃣ Obtain Handle for Server: We create a server instance by calling get_server, this will create a BLEServer instance. Heres the code:
let server = ble_device.get_server();
4️⃣ Define Server Connect & Disconnect Behaviour: using the server instance there exists a on_connect method for BLEServer. on_connect has one argument which is a closure that passes a handle for a BLEServer and a BLEConnDesc that contains connection information. In the closure body, upon connect, we'll print the connection data to the console then update the connection parameters. To update connection parameters, the BLEServerupdate_conn_params method is used and has the following signature:
pub fn update_conn_params(
    &mut self,
    conn_handle: u16,
    min_interval: u16,
    max_interval: u16,
    latency: u16,
    timeout: u16
) -> Result<(), BLEError>
conn_handle is the connection handle of the client, min_interval is a value for the minimum connection interval in ms, max_interval is a value for the maximum connection interval in ms, latency is expressed as the number of intervals to skip if theres no data to transmit, and timeout is the supervisiontimeout time in 10ms units. Here's the code:
server.on_connect(|server, clntdesc| {
    // Print connected client data
    println!("{:?}", clntdesc);
    // Update connection parameters
    server
        .update_conn_params(clntdesc.conn_handle(), 24, 48, 0, 60)
        .unwrap();
});
Similar to on_connect theres an on_disconnect method. on_disconnect also has one argument which is a closure that passes a handle for a BLEConnDesc and a Result that contains the reason for disconnection. All were going to do is to print a message that our device disconnected.
server.on_disconnect(|_desc, _reason| {
    println!("Disconnected, back to advertising");
});
5️⃣ Define Services & Characteristics: In this example, only one characteristic will be defined with a read and notify properties. However, every characteristic has to be associated with (listed under) a service. To create a service, within BLEServer there exists a create_service method that takes a single BleUuid argument. BleUuid is an enum representing a Bluetooth UUID. To make things easier, the nimble crate provides a uuid128 macro to parse a 128 UUID from string literals at compile time. We only need to pass a UUID string literal and the macro would take care of the rest. We create a service as follows:
// Create a service with custom UUID
let my_service = server.create_service(uuid128!("9b574847-f706-436c-bed7-fc01eb0965c1"));
The UUID used is a custom UUID generated using an online generator tool. create_service also returns a Arc<Mutex<BLEService>>.
Next, we need to create a characteristic. This is done using the BLEServicecreate_characteristic method which has two arguments; BlueUuid and NimbleProperties. NimbleProperties is a struct containing a collection of associated constants representing the different GATT operations. These constants can be or'ed together to define the operations that can modify the characteristic. Our characteristic will support READ and NOTIFY operations. create_characteristic will return a Arc<Mutex<BLECharacteristic>>. As such, we can set a starting value for the characteristic that we created using the BLECharacteristicset_value method. set_value takes a single &[u8] parameter. Here's the code:
// Create a characteristic to associate with created service
let my_service_characteristic = my_service.lock().create_characteristic(
    uuid128!("681285a6-247f-48c6-80ad-68c3dce18585"),
    NimbleProperties::READ | NimbleProperties::NOTIFY,
);

// Set a starting value for the characteristic
my_service_characteristic.lock().set_value(b"Start Value");
6️⃣ Configure Advertiser Data: This step is similar to what was done in the BLE Advertiser post. A small difference is that here we are also attaching the service to the advertisement data. This is done using the add_service_uuid method. Note that the UUID being advertised is the same service UUID created earlier.
// Configure Advertiser Data
ble_advertiser
    .lock()
    .set_data(
        BLEAdvertisementData::new()
            .name("ESP32 Server")
            .add_service_uuid(uuid128!("9b574847-f706-436c-bed7-fc01eb0965c1")),
    )
    .unwrap();
That's it for configuration!
📱 Application Code
Start Advertising: Now we have to start the advertising process. This is done by calling the BLEAdvertisingstart method.
ble_advertiser.lock().start().unwrap();
Update Characteristic: All we have to do now is keep updating the characteristic by calling the set_value method again. Here, the my_service_characteristic value keeps getting updated every one every second by incrementing its contents.
let mut val = 0;

loop {
    FreeRtos::delay_ms(1000);
    my_service_characteristic.lock().set_value(&[val]).notify();
    val = val.wrapping_add(1);
}
🧪 Testing
In order to test this code, you can use nRF connect mobile app or the bluefruit connect mobile app. In either app you would be able to connect to the ESP and poll the server data.
📱Full Application Code
Here is the full code for the implementation described in this post. You can additionally find the full project and others available on the apollolabs ESP32C3 git repo.
use esp32_nimble::{uuid128, BLEAdvertisementData, BLEDevice, NimbleProperties};
use esp_idf_hal::delay::FreeRtos;
use esp_idf_sys as _;

fn main() {
    esp_idf_sys::link_patches();

    // Take ownership of device
    let ble_device = BLEDevice::take();

    // Obtain handle for peripheral advertiser
    let ble_advertiser = ble_device.get_advertising();

    // Obtain handle for server
    let server = ble_device.get_server();

    // Define server connect behaviour
    server.on_connect(|server, clntdesc| {
        // Print connected client data
        println!("{:?}", clntdesc);
        // Update connection parameters
        server
            .update_conn_params(clntdesc.conn_handle(), 24, 48, 0, 60)
            .unwrap();
    });

    // Define server disconnect behaviour
    server.on_disconnect(|_desc, _reason| {
        println!("Disconnected, back to advertising");
    });

    // Create a service with custom UUID
    let my_service = server.create_service(uuid128!("9b574847-f706-436c-bed7-fc01eb0965c1"));

    // Create a characteristic to associate with created service
    let my_service_characteristic = my_service.lock().create_characteristic(
        uuid128!("681285a6-247f-48c6-80ad-68c3dce18585"),
        NimbleProperties::READ | NimbleProperties::NOTIFY,
    );

    // Modify characteristic value
    my_service_characteristic.lock().set_value(b"Start Value");

    // Configure Advertiser Data
    ble_advertiser
        .lock()
        .set_data(
            BLEAdvertisementData::new()
                .name("ESP32 Server")
                .add_service_uuid(uuid128!("9b574847-f706-436c-bed7-fc01eb0965c1")),
        )
        .unwrap();

    // Start Advertising
    ble_advertiser.lock().start().unwrap();

    // (Optional) Print dump of local GATT table
    // server.ble_gatts_show_local();

    // Init a value to pass to characteristic
    let mut val = 0;

    loop {
        FreeRtos::delay_ms(1000);
        my_service_characteristic.lock().set_value(&[val]).notify();
        val = val.wrapping_add(1);
    }
}
Conclusion
This post introduced how to create a BLE server on the ESP32-C3 with Rust. This was by using the esp32-nimble crate in a standard library development environment using the esp-idf-hal . In this post, the ESP32-C3 was configured as a peripheral device advertising a service. The device also assumes a server role after a connection is established. Have any questions? Share your thoughts in the comments below 👇.