


Table of contents
- Introduction
- FFI and the Linking Process
- bindgen
- Steps for Creating FFI bindings for an STM32 HAL
- The Hardware
- Step 1 - Generate the STM32 HAL Project
- Step 2 - Build the STM32 HAL C Project
- Step 3 - Generate a Static Library from the STM32 HAL C Project Output
- Step 4 - Copy Static Library into Build Path of Rust Project
- Step 5 - Add bindgen as a build dependency
- Step 6 - Create a wrapper.h Header
- Step 7 - Create a build.rs file
- Step 8 - Include the generated bindings in main.rs
- The Final Step (Step 9) - Integrate any needed functions
- Conclusion
Introduction
The more I hear about the adoption of embedded Rust in different outlets, there seems to be a recurring theme. The theme is that there seems to be some that believe that Rust adoption is going to happen gradually. Meaning that it's probably less likely that many projects would adopt Rust completely from scratch. Instead, some projects would integrate new Rust code into existing C or C++ codebases or alternatively, integrate existing C or C++ libraries into Rust projects. As such, it would be beneficial for somebody interested in getting into embedded to acquire the ability to do such things.
To enable integration of other languages, Rust provides what is referred to as the Foreign Function Interface (FFI). The FFI is a way to call Rust code from other programming languages or to call other languages' code from Rust. It allows Rust code to be used in a variety of contexts and environments, and also enables interoperability with existing libraries and frameworks written in other languages. As such, FFI allows developers to take advantage of Rust's safety and performance features while still being able to use existing code written in other languages.
In this post, I will demonstrate the use of FFI by importing STM32 HAL C headers into Rust. Following that, I will be creating a blinky program using the imported STM32 HAL functions in Rust. However, first I will revise how the linking process works and introduce a tool called bindgen that will make our lives much easier.
FFI and the Linking Process
To elaborate further on FFI, and taking C as an example, there are a couple of different ways to use Rust FFI, depending on the specific use case:
Calling Rust code from C: To call Rust code from C, you will need to define a "foreign function" in Rust that can be called from the other language. This is typically done using Rust's
externkeyword and a C-compatible function signature. Then you need to compile your Rust code as a C-compatible dynamic library (e.g. a .dll or .so file) and link it to your other language code.Calling C code from Rust: To call code written in C from Rust, you can use Rust's
externkeyword andlibattribute to define a "foreign function" that corresponds to the code you want to call. You will also need to use a Rust crate such as "libc" that provides C-compatible types and functions to interface with the foreign code.
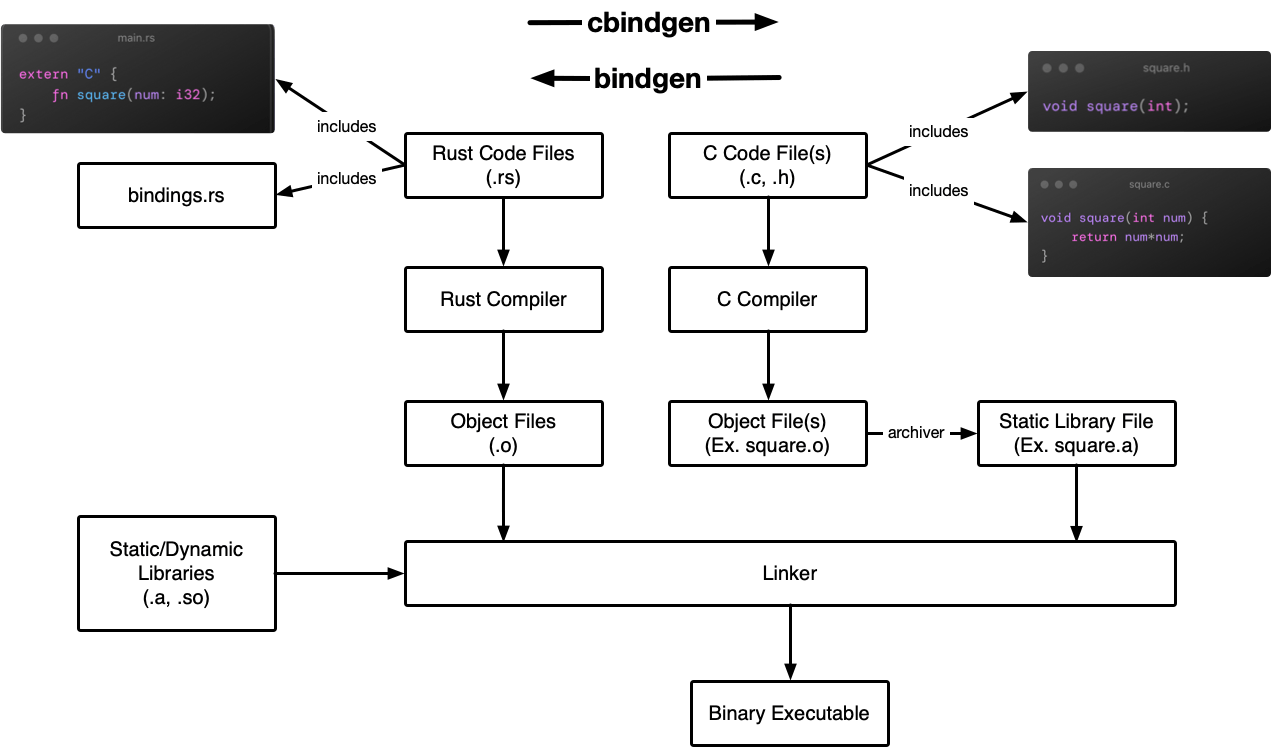
In general, the process of using Rust FFI will involve defining Rust functions with appropriate signatures, compiling the Rust code as a library, and linking that library to the other language code at runtime or statically. The figure below shows an example of flow. As shown, there are two separate toolchains with the Linker as the common part between the two. If, for example, we'd want to import a square() function from C to use in Rust, generally the steps are as follows:
We'd compile the C header and code resulting in object files (with .o extension).
Using an archiving tool and the created object files as input, a static (or dynamic) library that the linker would leverage is created.
Switching over to the Rust side, in the Rust application, the
externkeyword needs to be used to specify the foreign function and an additionallibattribute to specify the static library (created from the C toolchain) containing the function.Build the Rust application code.
bindgen
In this post, I mentioned I will be importing STM32 HAL C headers into Rust. As a result, according to the described flow, and given the complexity of the STM32 HAL project, one can imagine how tedious it would be to create an individual interface for every function in the project. As a matter of fact, I went first at attempting that myself and got quickly frustrated. Especially that there are a lot of dependencies.
In the figure shown earlier, you might have noticed the use of bindgen and cbindgen keywords. These are powerful tools widely used in the Rust ecosystem, with bindgen probably being the more popular tool. Bindgen is a Rust library that generates Rust FFI bindings to C and C++ libraries. It takes as input the C or C++ header files of a library and generates Rust code that can be used to call the functions and types defined in those headers. The generated Rust code provides a safe Rust API for the C/C++ library, allowing the Rust developer to use the library without having to manually write the FFI bindings.
Bindgen makes use of the clang tooling to parse the C/C++ headers and extract information about the types and functions defined in them. It also provides options to customize the generated Rust code, such as renaming types and functions, marking certain types as opaque, and ignoring certain functions or types.
Cbindgen is a tool similar to bindgen, but it generates C/C++ FFI bindings for Rust code instead of Rust bindings for C/C++ code. It takes as input a Rust library and generates C/C++ header files that can be used to call Rust functions and types from C/C++ code. Like bindgen, cbindgen uses clang to parse the Rust code and extract information about the types and functions defined in it.
In the remainder of this post, instead of the manual process of creating bindings, I will be going through the steps of using bindgen to generate Rust-compatible functions from the STM32 HAL. After that, I will use one of the generated functions in an existing Rust blinky application. You'll notice that although bindgen is being used, the process is still somewhat involved.
Before moving on, I recommend the below YouTube video for Jon Gjengset where he talks FFI, build scripts, bindgen, and cbindgen among other topics. The video gives a lot of useful insight into the topic, albeit not necessarily focused on embedded.
Steps for Creating FFI bindings for an STM32 HAL
📝 Note: The code and project folders refrenced used in this post are available on the apollolabsdev Nucleo-F401RE git repo.
The Hardware
In this post, the reference hardware used is the Nucleo-F401RE board. One can use a different STM32 hardware but needs to alternate the parameters to fit the different device/board.
Step 1 - Generate the STM32 HAL Project
In this first step, we need to generate/obtain the STM32 C project containing all the header and implementation files for the particular device. Luckily ST-Microelectronics provides a tool called CubeMX to configure and then generate C STM HAL project files for a particular board/device. For this step, thesteps from this ST Microelectronics tutorial can be followed. For the purpose of this post, since a simple blinky application is going to be created, I kept the basic configuration that exists for the Nucleo-F401RE board in the CubeMX. The main difference before generating the code, is for the Toolchain/IDE option, I selected Makefile.
Step 2 - Build the STM32 HAL C Project
After creating the project, we'll need to create a build folder in the STM32 HAL project root generated by Cube MX (my project file name was ffi_c_project), then run make from the same root folder. Ahead of running make though it is important to change the main routine name (I used mainc). If this is not changed, the linker would run into a conflict later since it will find two calls to main. This is because the Rust application also has a call to main and it's the one we're going to need. Better yet, if the main header and implementation files are not needed, they could be eliminated from the whole build process. In this case, they were not eliminated since there were dependencies of the main header in other files.
ffi_c_project % mkdir build
ffi_c_project % make
Once make is completed, all the generated object files can be located in the build folder.
Step 3 - Generate a Static Library from the STM32 HAL C Project Output
Next, we need to navigate to the build folder, and inside the build folder we need to run the archiving tool using ar rcs to create a static library from the generated object files
ffi_c_project % cd build
build % ar rcs libstm32.a gpio.o mainc.o stm32f4xx_hal_cortex.o stm32f4xx_hal_dma.o stm32f4xx_hal_dma_ex.o stm32f4xx_hal_exti.o stm32f4xx_hal_flash_ex.o stm32f4xx_hal_flash.o stm32f4xx_hal_gpio.o stm32f4xx_hal_msp.o stm32f4xx_hal_pwr.o stm32f4xx_hal_pwr_ex.o stm32f4xx_hal_rcc.o stm32f4xx_hal_rcc_ex.o stm32f4xx_hal_tim.o stm32f4xx_hal_tim_ex.o stm32f4xx_hal_uart.o stm32f4xx_it.o system_stm32f4xx.o usart.o stm32f4xx_hal.o
Note that the first argument provided to ar rcs is the name of the static library file that we want to create with a .a extension. I chose libstm32 as a name. Additionally, a word of note is that the library name needs to start with lib otherwise it would not be recognized later during the build process on the Rust project end.
Step 4 - Copy Static Library into Build Path of Rust Project
In this step, we first need to setup/create and build a simple blinky Rust project (For this purpose, I cloned and modified a past template I had based on the stm32f4xx-hal and renamed the Rust project to ffi_rust_project). After building the project, I copied the libstm32.a file into a directory where the build script can later find it. For that purpose, the libstm32.a file was copied to the /ffi_rust_project/target/debug/deps folder.
Step 5 - Add bindgen as a build dependency
This is the first step following the bindgen documentation. Here bindgen is added to the [build-dependencies] section of project's Cargo.toml file.
[build-dependencies]
bindgen = "0.53.1"
As a word of note, in this step, one needs to always check for the latest version of the dependency.
Step 6 - Create a wrapper.h Header
Now in the root of the Rust project, we need to create a wrapper.h file and include all the various headers containing declarations we want bindings for. In the include statements, we need to also state the path of where the header file is located. To reduce the length of the pathnames, I created a local folder that I called cheaders and copied over all the required headers. As such the following is the content the wrapper.h file:
#include "cheaders/stm32f4xx.h"
#include "cheaders/system_stm32f4xx.h"
#include "cheaders/stm32f401xe.h"

#include "cheaders/core_cm4.h"
#include "cheaders/cmsis_version.h"
#include "cheaders/cmsis_compiler.h"
#include "cheaders/cmsis_gcc.h"
#include "cheaders/mpu_armv7.h"

#include "cheaders/stm32f4xx_hal_conf.h"
#include "cheaders/stm32f4xx_it.h"
#include "cheaders/mainc.h"
#include "cheaders/gpio.h"
#include "cheaders/usart.h"

#include "cheaders/stm32f4xx_hal.h"
#include "cheaders/stm32f4xx_hal_rcc_ex.h"
#include "cheaders/stm32f4xx_hal_rcc.h"
#include "cheaders/stm32f4xx_hal_def.h"
#include "cheaders/Legacy/stm32_hal_legacy.h"
#include "cheaders/stm32f4xx_hal_gpio.h"
#include "cheaders/stm32f4xx_hal_gpio_ex.h"
#include "cheaders/stm32f4xx_hal_exti.h"
#include "cheaders/stm32f4xx_hal_dma.h"
#include "cheaders/stm32f4xx_hal_dma_ex.h"
#include "cheaders/stm32f4xx_hal_cortex.h"
#include "cheaders/stm32f4xx_hal_flash.h"
#include "cheaders/stm32f4xx_hal_flash_ex.h"
#include "cheaders/stm32f4xx_hal_flash_ramfunc.h"
#include "cheaders/stm32f4xx_hal_pwr.h"
#include "cheaders/stm32f4xx_hal_pwr_ex.h"
#include "cheaders/stm32f4xx_hal_uart.h"
Step 7 - Create a build.rs file
In this step, we need to create a build.rs file in the root of the Rust project. Essentially, build.rs provides a way ot automate custom build scripts. If a build.rs file exists in the project rool, cargo would automatically detect it at build time and execute its contents during the build process. In our case, we will be generating Rust FFI bindings at compile time for the header files we listed in wrapper.h. The resulting bindings will be written to $OUT_DIR/bindings.rs where $OUT_DIR is chosen by cargo and in our case looks something like ./ffi_rust_project/target/thumbv7em-none-eabihf/debug/build/stm32f4xxgpio-f938e89b3fb3229f/out/ .
The build.rs contents are more or less provided by the bindgen documentation, and looks as follows:
use std::env;
use std::fs::File;
use std::io::Write;
use std::path::PathBuf;

fn main() {
    // Put `memory.x` in our output directory and ensure it's
    // on the linker search path.
    let out = &PathBuf::from(env::var_os("OUT_DIR").unwrap());
    File::create(out.join("memory.x"))
        .unwrap()
        .write_all(include_bytes!("memory.x"))
        .unwrap();
    println!("cargo:rustc-link-search={}", out.display());
    println!("cargo:rustc-link-lib=static=stm32");

    // By default, Cargo will re-run a build script whenever
    // any file in the project changes. By specifying `memory.x`
    // here, we ensure the build script is only re-run when
    // `memory.x` is changed.
    println!("cargo:rerun-if-changed=memory.x");

    // Tell cargo to invalidate the built crate whenever the wrapper changes
    println!("cargo:rerun-if-changed=wrapper.h");

    // The bindgen::Builder is the main entry point
    // to bindgen, and lets you build up options for
    // the resulting bindings.
    let bindings = bindgen::Builder::default()
        // The input header we would like to generate
        // bindings for.
        .header("wrapper.h")
        .use_core()
        .ctypes_prefix("cty")
        // Tell cargo to invalidate the built crate whenever any of the
        // included header files changed.
        .parse_callbacks(Box::new(bindgen::CargoCallbacks))
        // Finish the builder and generate the bindings.
        .generate()
        // Unwrap the Result and panic on failure.
        .expect("Unable to generate bindings");

    // Write the bindings to the $OUT_DIR/bindings.rs file.
    let out_path = PathBuf::from(env::var("OUT_DIR").unwrap());
    bindings
        .write_to_file(out_path.join("bindings.rs"))
        .expect("Couldn't write bindings!");
}
However, here there are some differences. There is some code that exists from earlier that has to do with the linker script including the device memory map in memory.x. Apart from that, relevant to the bindgen code, there are two things to note. First, note the following line:
println!("cargo:rustc-link-lib=static=stm32");
This line states the name of the link library stm32 without the lib prefix. Second, note the use_core() and ctypes_prefix("cty") methods used when creating the bindings handle. These methods are needed since we need to generate [no_std] compatible bindings. Without them the bindings will be created assuming there is std support resulting in errors later.
Step 8 - Include the generated bindings in main.rs
Now that we have the bindings created we need to include the needed statements in main.rs allowing us to use them. That is done with the following code:
#![allow(non_upper_case_globals)]
#![allow(non_camel_case_types)]
#![allow(non_snake_case)]

include!(concat!(env!("OUT_DIR"), "/bindings.rs"));
The #![allow(...)] pragmas are needed to suppress a bunch of warnings that do not follow Rust's style conventions.
The Final Step (Step 9) - Integrate any needed functions
Finally, we can use function interfaces that were created in bindings.rs. The following is a snippet of the main function in the Rust blinky project with some using the HAL_GPIO_TogglePin() function interface:
const GPIOA: *mut GPIO_TypeDef = GPIOA_BASE as *mut GPIO_TypeDef;
const GPIO_PIN_5: u16 = 0x0020;

#[entry]
fn main() -> ! {
    // Application Loop
    // Setup handler for device peripherals
    let dp = pac::Peripherals::take().unwrap();
    let rcc = dp.RCC.constrain();
    let clocks = rcc.cfgr.use_hse(8.MHz()).freeze();

    let mut del = dp.TIM1.delay_ms(&clocks);

    let gpioa = dp.GPIOA.split();
    let _led = gpioa.pa5.into_push_pull_output();

    loop {
        // Call C function in bindings.rs that toggles pin
        unsafe {
            HAL_GPIO_TogglePin(GPIOA, GPIO_PIN_5);
        }
        del.delay_ms(1000_u32);
    }
}
In this application code, instead I replaced the expected led.toggle() with the HAL_GPIO_TogglePin() function interface instead. In this case, any foreign code used is wrapped in an unsafe{} block. This essentially means that the Rust compiler cannot guarantee the safety of this code. Additionally, if you notice the const definitions early on, GPIO_TypeDef is an imported type representing a struct with the offsets of the registers in a GPIO memory block. Additionally, GPIOA_BASE is an imported u32 representing the base address of where the GPIOA registers are located in memory.
📝 Note: The build script allows the user to do a lot more things to automate the build process. In reality, there are probably more steps from what we have done that could be automated. One can navigate the bindgen user guide and Builder struct docs.rs documentation to find out what other methods exist to automate more of the process.
📝 Note: As a word of caution, things might appear simpler than they actually are and might get tricky. For one, care must be taken in using Rust FFI to ensure that data is passed between languages correctly and that any memory allocated by one language is properly deallocated by the other. Additionally, even for the code I'm demonstrating in this post, not all imported functions worked as expected. For example, I experimented with delays by using the imported
HAL_Delay()function. Interestingly enough, after executing theHAL_Delay(), the application code kept unexplainably entering and hanging up in anDefault_Handler()interrupt service routine.
Conclusion
In the context of embedded systems, the gradual adoption of Rust is expected to require interfacing to existing code bases from other languages like C or C++. For that, Rust provides the Foreign Function Interface (FFI) that enables that ability. Additionally, within the Rust ecosystem there exists tools like bindgen that automate the process of interfacing more complex codebases. In this post, FFI is explained and a step by step tutorial is provided going over an example creating Rust interfaces for the C-based STM32 HAL libraries. Have any questions/comments? Share your thoughts in the comments below 👇.