


Introduction
This post is a start of a new series where I'll be exploring embedded Rust at the HAL with the ESP32. For those following my posts, in past series, I explored embedded Rust with the STM32 both at the HAL (Hardware Abstraction Layer) and PAC (Peripheral Access Crate) levels (You can check out the STM32 series here). For the time being, I chose to switch over to the ESP32 for the following reasons:
Official Support: Rust is officially supported by Espressif. This provides for well-maintained crates and documentation. As I've indicated in this post, if I were to start over, the ESP would be my choice.
Wokwi Support: Access to hardware components is not always easy (or even cheap for that matter). Additionally, component wiring could become a real headache. Wokwi provides for an awesome alternative to simulate projects in a browser and it also supports ESP with Rust. Wokwi is not your typical simulator though, it is much more useful and closer to embedded hardware than anything I've seen before. Moreover, Wokwi supports many popular commercial components and is in constant improvement by the community. Projects created in Wokwi can also be used as is with the actual hardware. The only difference is that with actual hardware one would need to set up the debug/flash toolchain.
Project Examples: Given the earlier reasons, this would allow the creation of more involved projects in the future. Additionally, Wokwi facilitates a Wifi connection simulation. This would enable the creation of IoT Project examples.
Explore Differences Between Platforms: Between the ESP and other platforms (Ex. STM32) I'm interested in knowing of any differences when it comes to Rust implementation. This could be in documentation or even in using frameworks like embassy. The ESP32 for example does not have an embassy-supported HAL like the STM32 or nRf devices. However, that does not mean that the embassy framework cannot be used with the ESP32. These are things I'd like to explore.
Given the above reasons, at the beginning of the Rust with ESP32 series, I will be repeating many of the examples in my past STM32 series. This would allow drawing comparisons before digging deeper into more complex examples. I will be exclusively working at the HAL level (the esp32c3-hal in particular). In this post, I will be starting out with the GPIO peripheral. We'll see how to configure GPIO, read inputs, and manipulate output at the HAL. The example here is a bit more advanced version of blinky.
📚 Knowledge Pre-requisites
To understand the content of this post, you need the following:
Basic knowledge of coding in Rust.
Familiarity with the basic template for creating embedded applications in Rust.
💾 Software Setup
All the code presented in this post is available on the apollolabs ESP32C3 git repo. Note that if the code on the git repo is slightly different then it means that it was modified to enhance the code quality or accommodate any HAL/Rust updates.
Additionally, the full project (code and simulation) is available on Wokwi here.
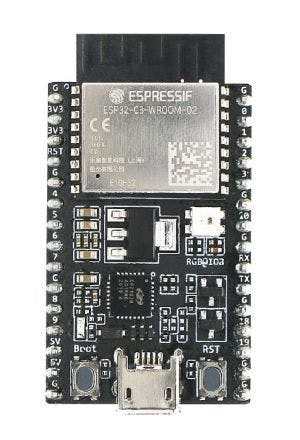
🛠 Hardware Setup
Materials
-
Any color LED
Current limiting resistor
Pushbutton
🔌 Connections
📝 Note
All connection details are also shown in the Wokwi example.
Connections include the following:
The LED anode through a resistor to pin 4 of the devkit. This pin will be used as an output. The cathode will be connected to ground.
One end of a button to pin 0 of the devkit This pin will be used as an input. The other end of the switch will be connected to ground.
👨🎨 Software Design
In the application developed in this post, I want to cycle through several LED blinking frequencies based on a button press. Meaning, that every time I press the on-board button, I want to see the LED turning on and off at a different speed. In this section, I will focus on the design of the application algorithm itself rather than the configuration aspects.
Some assumptions I am taking in this design:
Only GPIO peripherals are going to be used. Even for delay purposes, I will not be using any timer peripherals.
The design will use a polling-based approach (rather than interrupts) to detect button press events. This is going to make things a bit tricky algorithmically (more explanation later).
For the second assumption, note that interrupts would have made things really convenient. Though I will not be using interrupts because of two reasons; the first is that interrupts are generally a more advanced concept, and the second is that interrupts in Rust are a bit more challenging to implement compared to the traditional approach in C or C++. As a result, I'd like to keep this post as simple as possible to grasp fundamental concepts first. In the future, I probably will create a separate post for an interrupt-based approach for the same application.
Moving on, let's try to represent our algorithm. I am going to use a flow chart as it would be helpful for this. Here's one possible approach:
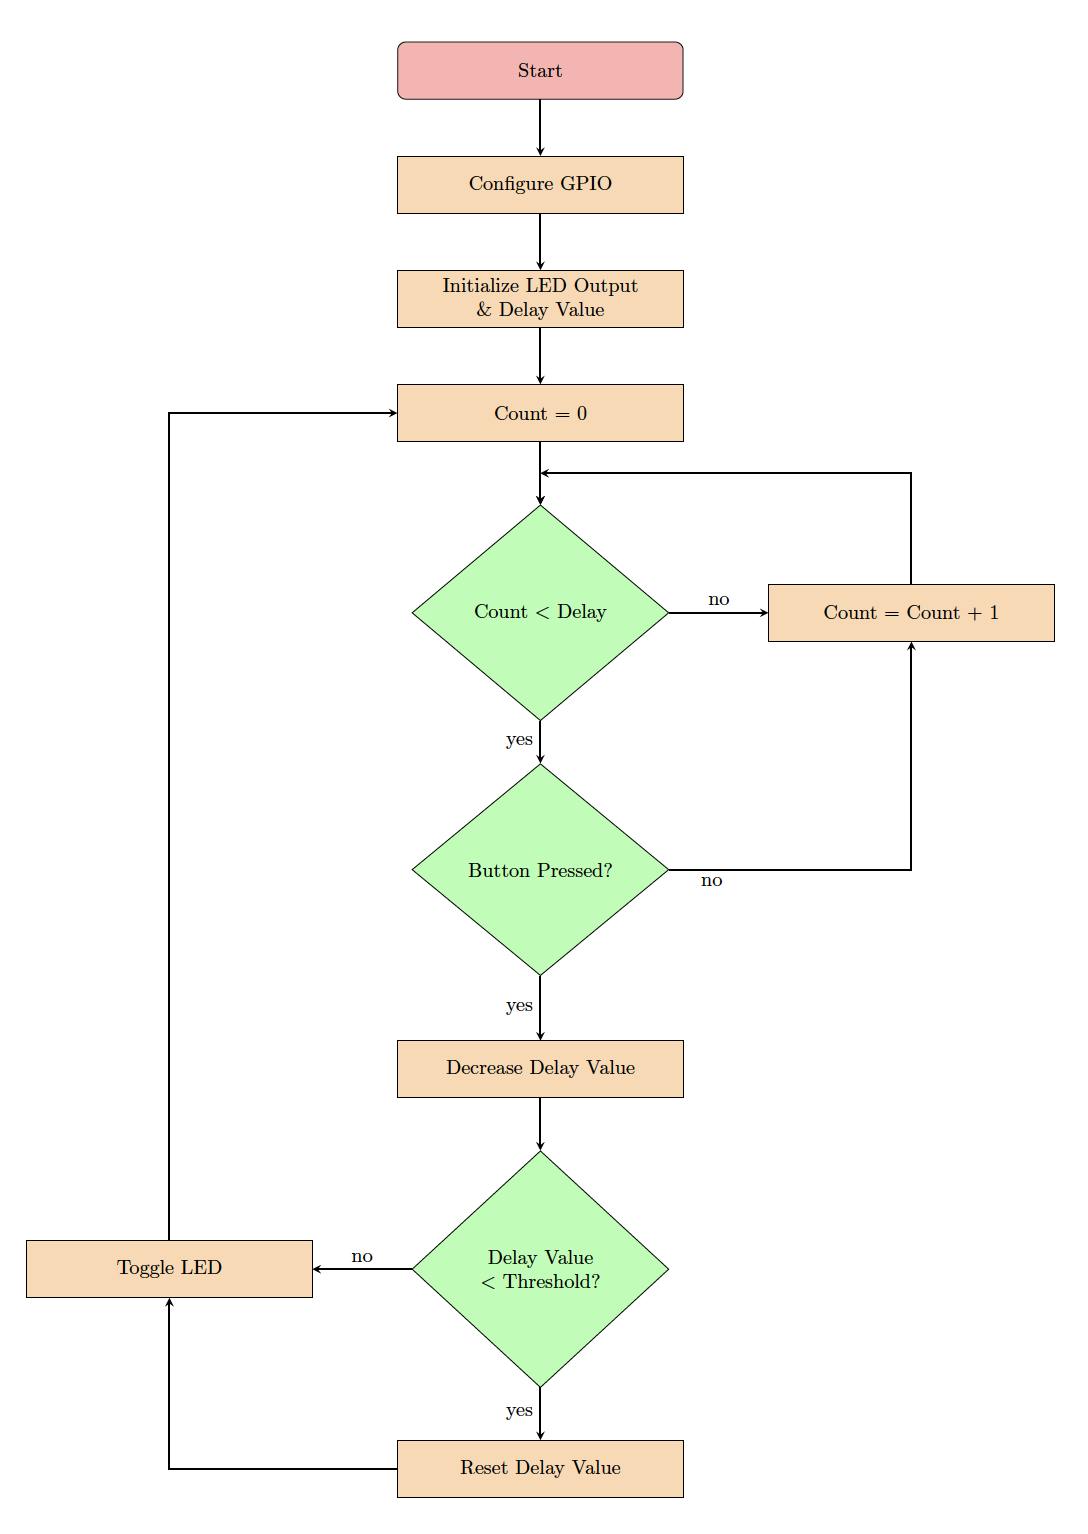
Let's analyze what is happening here. After configuring the GPIO pins, I am initializing a delay value (or variable). This is a value I am going to use to algorithmically create a delay. In addition, I am going to initialize the LED output (to on or off). Consequently, I initialize a count variable to zero and enter a loop that keeps on incrementing the count until it reaches the delay value I selected. Inside the delay loop, I am also polling the button to check if it gets pressed. If the button is pressed at any point, I need to decrease the delay value so that I increase the frequency of blinking. However, I have to also check that the new delay value does not go negative. As such, if the delay value drops below a certain threshold I want to reset it to the original value I started with. Once the check is complete I can toggle the LED output and go back to initialize the delay loop all over again.
🚨 Important Notes:
1️⃣ Note how I had to check for the button press in the delay loop. This is because if I wait till after I would potentially be missing button presses, especially when the delay is long. This is why earlier, I was mentioning that interrupts would be more convenient. Through interrupts I would be pausing operations to respond to the button pressing event immediately.
2️⃣ Since I am algorithmically creating a delay, note that this code is not portable between different devices and is not scalable. This means that you would see different delays depending on the device parameters and code responsiveness. How is this addressed? Typically delays are not created using software but rather hardware sources like timers/counters.
Let's now jump into implementing this algorithm.
👨💻 Code Implementation
📥 Crate Imports
In this implementation, three crates are required as follows:
The
riscv_rtcrate for startup code and minimal runtime for RISC-V microcontrollers.The
esp_backtracecrate to define the panicking behavior.The
esp32c3_halcrate to import the ESP32C3 device hardware abstractions.
use esp32c3_hal::{clock::ClockControl, pac::Peripherals, prelude::*, timer::TimerGroup, Rtc, Delay, IO};
use esp_backtrace as _;
use riscv_rt::entry;
📝 Note
Each of the crate imports needs to have a corresponding dependency in the Cargo.toml file.
🎛 Peripheral Configuration Code
Ahead of our application code, peripherals are configured through the following steps:
1️⃣ Obtain a handle for the device peripherals: In embedded Rust, as part of the singleton design pattern, we first have to take the PAC level device peripherals. This is done using the take() method. Here I create a device peripheral handler named dp as follows:
let dp = Peripherals::take().unwrap();
2️⃣ Disable the Watchdogs: The ESP32C3 has watchdogs enabled by default and they need to be disabled. If they are not disabled then the device would keep on resetting. I'm not going to go into much detail, however, watchdogs require the application software to periodically "kick" them to avoid resets. This is out of the scope of this example, though to avoid this issue, the following code needs to be included:
let system = peripherals.SYSTEM.split();
let clocks = ClockControl::boot_defaults(system.clock_control).freeze();

// Instantiate and Create Handles for the RTC and TIMG watchdog timers
let mut rtc = Rtc::new(peripherals.RTC_CNTL);
let timer_group0 = TimerGroup::new(peripherals.TIMG0, &clocks);
let mut wdt0 = timer_group0.wdt;
let timer_group1 = TimerGroup::new(peripherals.TIMG1, &clocks);
let mut wdt1 = timer_group1.wdt;
3️⃣ Instantiate and Create Handle for IO: We need to configure the LED pin as a push-pull output and obtain a handler for the pin so that we can control it. We also need to obtain a handle for the button input pin. Before we can obtain any handles for the LED and the button we need to create an IO struct instance. The IO struct instance provides a HAL-designed struct that gives us access to all gpio pins thus enabling us to create handles for individual pins. This is similar to the concept of a split method used in other HALs (more detail here). We do this by calling the new() instance method on the IO struct as follows:
let io = IO::new(peripherals.GPIO, peripherals.IO_MUX);
Note how the new method requires passing the GPIO and IO_MUX peripherals.
4️⃣ Obtain a handle for the LED and configure it to an output: As earlier stated, the LED is connected to pin 4 (gpio4). As such, we need to create a handle for the LED pin that has gpio4 configured to a push-pull output using the into_push_pull_output() method. We will name the handle led and configure it as follows:
let mut led = io.pins.gpio4.into_push_pull_output();
For those interested, this HAL documentation page has the full list of methods that the GpioPin type supports.
5️⃣ Obtain a handle and configure the input button: The push button is connected to pin 0 (gpio0) as stated earlier. Additionally, in the pressed state, the button pulls to ground. Also, for the button unpressed state, a pull-up resistor needs to be included so the pin goes high. An internal pull-up can be configured for the pin using the into_pull_up_input() method as follows:
let button = io.pins.gpio0.into_pull_up_input();
Note that as opposed to the LED output, the button handle here does not need to be mutable since we will only be reading it.
📱 Application Code
Following the design described earlier, I first need to initialize a delay variable del_var and initialize the output of the LED. del_var needs to be mutable as it will be modified by the delay loop. I also choose to set the initial output level to low by default. Using the same Pin methods mentioned earlier, there is a set_low() method that I use to achieve that. Also set_low() returns a Result that needs to be unwrapped.
    // Create and initialize a delay variable to manage delay loop
    let mut del_var = 10_0000_u32;

    // Initialize LED to on or off
    led.set_low().unwrap();
Next inside the program loop I create a loop that keeps going around until it reaches the value of del_var. As indicated in the design section, if the loop ends naturally then del_var remains unchanged. Otherwise, at any point in time while delaying, if the button is pressed I can detect it using the is_low() method (also returns a Result that needs to be unwrapped). At which point I will be decreasing del_var by 2_5000_u32. If I end up with a del_var value less than 2_5000_u32 then I am restoring the original value I started with of 10_0000_u32. After the delay completes, I toggle led using the toggle() method, again part of the methods available for the GpioPin type.
Why am I using the values 10_0000_u32 and 2_5000_u32? It was actually trial and error. I kept trying values until I found ones that flash the LED in a satisfactory manner. As mentioned earlier since I am creating delays algorithmically, the duration of delays really depends on the platform in use.
// Application Loop
loop {
   for _i in 1..del_var {
      // Check if button got pressed
      if button.is_low().unwrap() {
         // If button pressed decrease the delay value
         del_var = del_var - 2_5000_u32;
         // If updated delay value = zero reset to start value
         if del_var < 2_5000 {
            del_var = 10_0000_u32;
         }
       }
    }
    // Toggle LED
    led.toggle();
}
🚨 Important Notes:
Once you run the code, you'll see the LED flashing but you'll notice some weird behavior. The flashing frequencies would seem to keep changing in random order. This is because of an effect called "bouncing" on the mechanical button. In Wokwi, you can choose to eliminate the bouncing effect if you'd like. Check the experimentation ideas section below for more detail.
📱 Full Application Code
Here is the full code for the implementation described in this post. You can additionally find the full project and others available on the apollolabs ESP32C3 git repo. Also the Wokwi project can be accessed here.
#![no_std]
#![no_main]

use esp32c3_hal::{clock::ClockControl, pac::Peripherals, prelude::*, timer::TimerGroup, Rtc, Delay, IO};
use esp_backtrace as _;
use riscv_rt::entry;

#[entry]
fn main() -> ! {
    // Take Peripherals, Initialize Clocks, and Create a Handle for Each
    let peripherals = Peripherals::take().unwrap();
    let system = peripherals.SYSTEM.split();
    let clocks = ClockControl::boot_defaults(system.clock_control).freeze();

    // Instantiate and Create Handles for the RTC and TIMG watchdog timers
    let mut rtc = Rtc::new(peripherals.RTC_CNTL);
    let timer_group0 = TimerGroup::new(peripherals.TIMG0, &clocks);
    let mut wdt0 = timer_group0.wdt;
    let timer_group1 = TimerGroup::new(peripherals.TIMG1, &clocks);
    let mut wdt1 = timer_group1.wdt;

    // Disable the RTC and TIMG watchdog timers
    rtc.swd.disable();
    rtc.rwdt.disable();
    wdt0.disable();
    wdt1.disable();

    // Instantiate and Create Handle for IO
    let io = IO::new(peripherals.GPIO, peripherals.IO_MUX);

    // Instantiate and Create Handle for LED output & Button Input
    let mut led = io.pins.gpio4.into_push_pull_output();
    let button = io.pins.gpio0.into_pull_up_input();


    // Create and initialize a delay variable to manage delay loop
    let mut del_var = 10_0000_u32;

    // Initialize LED to on or off
    led.set_low().unwrap();

    // Application Loop
    loop {
    for _i in 1..del_var {
        // Check if button got pressed
        if button.is_low().unwrap() {
            // If button pressed decrease the delay value
            del_var = del_var - 2_5000_u32;
            // If updated delay value reaches zero then reset it back to starting value
            if del_var < 2_5000 {
                del_var = 10_0000_u32;
            }
        }
    }
        // Toggle LED
        led.toggle();

    }
}
🔬 Further Experimentation/Ideas
Most mechanical press buttons require what is called debouncing. Buttons when pressed have a "bouncing" effect that can lead to multiple presses being detected. As a result, debouncing is required and can be achieved through hardware or software. The effect is best viewed by using an oscilloscope on the output of the pin. Check out this page by Jack Ganssle for more detail about button bouncing and algorithms to eliminate the effect. If you look hard enough, you might even find a crate you can leverage for debouncing the button 😉.
For some Rust practice, write the same code, eliminating the function and integrating the
loop_delaybody in the application loop.Connect multiple LED outputs and create different LED lighting patterns. You can use the button to switch between patterns.
Instead of the LED, connect a buzzer to the output and generate different tones. You can use multiple button inputs to increase/decrease the frequency of the tone.
Conclusion
In this post, an LED control application was created leveraging the GPIO peripheral for the ESP32C3 microcontroller. All code was created at the HAL level using the esp32c3-hal. Have any questions? Share your thoughts in the comments below 👇.