


Introduction
Interestingly enough, when I set out on learning to code embedded Rust at the HAL level I found it more challenging than developing with the PAC. For me, the PAC was straightforward somewhat. At the PAC level, I knew exactly what I needed to do at the register level. With the provided PAC-level API, I only had to read and write to the registers based on reference manual descriptions. I could also have created my own drivers for different peripherals, albeit not necessarily adhering to embedded HAL standards. I think the challenge came down to two main reasons. One was navigating the documentation, and the second was methods that are specific to the Rust embedded model.
Even when starting out with simple examples two methods I struggled with in particular and took me a while to understand were split() and constrain(). From the various resources I dug into, I didn't find the explanations to be sufficient in explaining what either method did. Documentation was also quite vague in many instances and didn't explain much. Further, I was left with questions such as:
What are the distinctions between
split()andconstrain()?On which peripherals should I be using either method?
How do I know that I need to use either method?
These questions are ones that actually prevented me from using the HAL for a while although the HAL technically should be more abstracted and easier to use. That was in addition to getting used to navigating the documentation which seemed to go around in loops at times. I didn't like the feeling of doing something that was not clear, so I spent some time wrapping my head around the topic. This was in addition to practicing doing the same thing across different HALs to see if I managed to read the documentation properly. As of recently, I believe I found answers to all the aforementioned questions. As such, in this post, I'm going to shed more light, hopefully providing helpful answers for embedded Rust newcomers.
Embedded Rust Abstractions
Before digging in, it might be beneficial to quickly revisit embedded Rust abstractions. In embedded Rust, there are several levels of abstraction that are introduced on top of microcontroller hardware as shown in the figure. The first level is the peripheral access crate (PAC) which gives us access to low-level microcontroller registers at the bit level. It's also worth noting that the PAC is specific to a particular microcontroller series such as the ST Microelectronics stm32f4xx or the Texas Instruments tm4c123x. The microarchitecture crate is at a similar abstraction level to the PAC but specific to processor core (Ex. ARM Cortex-M) functions.
Going another level up the chain, we then have the hardware abstraction layer (HAL) crate. HAL crates are supposed to offer more portability and user-friendly API for a particular processor. This occurs by implementing some common traits defined in what is referred to as the embedded-hal. Additionally, the HAL attempts to incorporate mechanisms, or wrappers around lower-level functions, that are part of the Rust safety model.
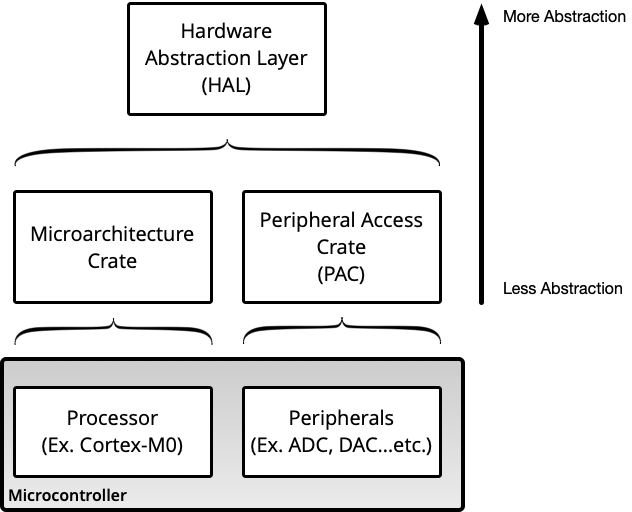
Side note: there are also board-level crates that sit on top of the HAL and are omitted from the figure as they aren't necessary for our discussion
Among these several abstractions, we can program a microcontroller device at any level we like. Additionally, we can develop code with a mix of low-level and high-level abstractions. Obviously, to make code more portable it's better to stick to higher-level abstractions.
Revisiting Blinky
I figured to better explain the concepts at hand, it would be beneficial to revisit a simple HAL-level blinky program. As such, below is the code inside the main function of a blinky program targeting the Nucleo-F401RE board and leveraging the stm32f4xx HAL.
fn main() -> ! {

        // Create handles for the device and core peripherals
        let dp = pac::Peripherals::take().unwrap();
        let cp = cortex_m::peripheral::Peripherals::take().unwrap();

        // Create an the LED abstraction. On the Nucleo-401RE it's connected to pin PA5.
        let gpioa = dp.GPIOA.split();
        let mut led = gpioa.pa5.into_push_pull_output();

        // Set up the system clock. We want to run at 48MHz for this one.
        let rcc = dp.RCC.constrain();
        let clocks = rcc.cfgr.sysclk(48.MHz()).freeze();

        // Create a delay abstraction based on SysTick
       let mut delay = cp.SYST.delay(&clocks);

        loop {
            // On for 1s, off for 1s.
            led.set_high();
            delay.delay_us(1000_u32);
            led.set_low();
            delay.delay_us(1000_u32);

    }
}
Examining the above program, we find that the general anatomy of the program consists the following steps:
- Gain Access to Device and/or Core Peripherals
- Configure Device Peripheral(s)
- Configure System/Core Function(s)
- Utilize Peripheral(s)
In the following, we will analyze the code for the individual parts providing more insight into the areas of interest.
1. Gain Access to Device and/or Core Peripherals
Gaining access to the peripherals is achieved in the following two lines:
let dp = pac::Peripherals::take().unwrap();
let cp = cortex_m::peripheral::Peripherals::take().unwrap();
Here we are creating handles for the device and core peripherals. Essentially we are bringing the peripheral structs from the PAC and the core into the current execution context by using the take() method. This is all part of the embedded Rust safety model to ensure that only a single instance of Peripherals is created. Embedded Rust follows a singleton design pattern that restricts the instantiation of a class to one object. As such, the take() method returns an Option struct (explains the usage of unwrap()), and for the first time the method is called on a Peripherals struct it returns a Some. For any consecutive calls of take(), a None is returned instead. This guarantees that there is only one instance of Peripherals in the program and that it exists only in the current execution context. This also means that Peripherals is not globally shared among threads. Still Peripherals is "Sendable" to other execution contexts, but that's a separate topic for a different time.
2. Configure Device Peripheral(s)
The peripheral that we are going to use in our blinky program is GPIO. PA5 (pin 5 in port A) on the Nucleo-401RE board is the one connected to the board integrated LED. As such, we want to configure the PA5 pin on the Nucleo-401RE board to a push-pull output so that we can control its level later. This is captured by the following two lines:
let gpioa = dp.GPIOA.split();
let mut led = gpioa.pa5.into_push_pull_output();
Without the need to refer to documentation, I always found the into_push_pull_output() method self-explanatory. It's a method that converts the pin to a push-pull output, which is one of the configurations available for the pin as described in the reference manual. Now, what always made me wonder here is why do we need the let gpioa = dp.GPIOA.split(); line? Why couldn't we do something like let led = dp.GPIOA.pa5.into_push_pull_output(); immediately?! It would make more sense. Actually, I did attempt to do something like that at some point and got this compiler output:
error[E0609]: no field `pa5` on type `GPIOA`
  --> src/main.rs:58:32
   |
58 |         let mut led = dp.GPIOA.pa5.into_push_pull_output();
   |                                ^^^ unknown field
so the compiler did not recognize pa5 in GPIOA, as a result, I looked at the documentation for split() and found the following description:
Extension trait to split a GPIO peripheral in independent pins and registers
with the following signature:
fn split(self) -> Self::Parts;
so the split() method is returning a Parts structure. Additionally, digging further into the STM32F4xx HAL GPIO documentation, in the gpioa module I found a Parts struct that looks like this:
pub struct Parts {
    pub pa0: PA0,
    pub pa1: PA1,
    pub pa2: PA2,
    pub pa3: PA3,
    pub pa4: PA4,
    pub pa5: PA5,
    pub pa6: PA6,
    pub pa7: PA7,
    pub pa8: PA8,
    pub pa9: PA9,
    pub pa10: PA10,
    pub pa11: PA11,
    pub pa12: PA12,
    pub pa13: PA13<Debugger>,
    pub pa14: PA14<Debugger>,
    pub pa15: PA15<Debugger>,
}
Examining the Parts structure members, as might be obvious, each one of the members corresponds to a pin in port A. Further, I found out from the documentation that each member is a generic Pin type. For the Pin type, I also found in the documentation all the Pin associated methods including into_push_pull_output() that we've already seen in addition to the set_high() and set_low() methods that we'll be using later to allow us to set and clear the pin output, respectively.
So what does this all mean? Methods like into_push_pull_output() are applied on a Pin type that is part of a Parts struct that is not already a part of the PAC-level GPIOA module. Well, it turns out that the Parts struct does not exist from the get-go just by importing the HAL. This is addressed by using the split() method on the PAC-level GPIOA module. This means that you have to manually "promote" the PAC-level module to a HAL level Parts structure by calling the split() method. The way it can be read is that we are "splitting" the PAC level structure into individual parts making the Parts struct available for usage with HAL abstractions/methods. As we've seen earlier, in the GPIO case, the Parts structure represents the collection of the individual pins in the port where each is of type Pin that has a collection of HAL applicable methods.
3. Configure System/Core Function(s)
Since we want to introduce a delay, we need some sort of timer which we will be using the SysTick core peripheral timer. As a result, in order to use the SysTick timer, we are required to configure the system clock(s) through the reset and clock control (RCC) registers. Let's first start with configuring clocks through the RCC. We want to run the system clock at 48 MHz. This is accomplished in the following two lines:
let rcc = dp.RCC.constrain();
let clocks = rcc.cfgr.sysclk(48.MHz()).freeze();
Looking at the first line, we see the constrain() method being applied to RCC. Looking into the documentation we would find the following vague description for constrain():
Constrains the RCC peripheral so it plays nicely with the other abstractions
Additionally, the signature of the constrain method looks something like this:
fn constrain(self) -> Rcc;
where the Rcc struct was defined as "constrained RCC peripheral" and has the following definition:
pub struct Rcc {
    pub cfgr: CFGR,
}
After some digging, I found my answer in the Embedded in Rust [brave new I/O blog post]((blog.japaric.io/brave-new-io), albeit a bit confusing in the beginning. If you look into the blog post, it seems split() and constrain() are used interchangeably at some point. Additionally, the signature of the constrain() method returns a Parts struct just like the split() method. Similar to the idea with Parts, the HAL level methods are applied to the members of the "constrained" Rcc struct. What happens essentially is that the PAC level RCC module that gives access to all registers is consumed to provide a HAL version with "constrained" operations. These operations are performed on the RCC registers through the HAL-defined methods. In this case, Rcc has a CFGR type that exposes the API allowing us to configure the frequency of each clock.
I personally like to view constrain() as a special case of split(). Because again in the constrain() case we are promoting a PAC-level struct to a HAL level one but under special conditions. Why is all this needed you ask? well, there are several reasons that are mostly related to the Rust safety model. The motivation behind this approach is also largely explained in the [brave new I/O blog post]((blog.japaric.io/brave-new-io).
Moving on to the next line let clocks = rcc.cfgr.sysclk(48.MHz()).freeze();, the sysclk() and freeze() are being applied to configure the clocks. The sysclk() method sets the desired frequency for the SYSCLK clock. The freeze() method on the other hand makes effective the configuration by consuming CFGR and returning a Clocks struct indicating that the clock configuration can no longer be changed. Again, this is a mechanism introduced by the Rust embedded safety model. This needs to be done because downstream in code frozen clocks are required for the initialization of other abstractions. In our case, that would be the SysTick timer. This mechanism guarantees that clocks are not changed during the operation time.
Finally, in the remaining line shown below, we create the delay abstraction based on the SYST SysTick core peripheral timer. This is done by passing a reference to the frozen clocks handle the delay() method.
let mut delay = cp.SYST.delay(&clocks);
4. Utilize Peripheral(s)
This is the final step in our code and essentially has to do with applying the blinky logic. Now that all is configured, it becomes quite straightforward to control the gpio output and insert delays as shown in the following:
led.set_high();
delay.delay_us(10000_u32);
led.set_low();
delay.delay_us(10000_u32);
As might already be obvious, the set_high() and set_low() methods are applied to the led abstraction to set and clear the gpio (pa5) output. Additionally, the delay_us(10000_u32) method is being applied to the delay abstraction to introduce a 10000 us of delay.
So, when do I use split() and/or constrain()?
After we've figured out the purpose of split() and constrain(), the question that begs itself is, how do we know when to use either? Can we assume that the methods apply to the same modules across all HALs? The quick answer is that we'd always have to check the documentation for the particular device used. This is done by examining the signatures and abstractions that the methods apply. For me, I actually scanned the documentation of several HALs to check for variations (side note: it actually also takes a while to get used to navigating the documentation, especially from a hierarchical aspect). A good example is comparing the flash module in the stm32f4xx and stm32f1xx HALs. The stm32f1xx HAL actually utilizes the constrain() method to create a constrained flash abstraction along the same lines explained earlier. On the other hand, the stm32f4xx HAL does not require the same approach and the methods are applied directly to the PAC level struct pac::FLASH.
Conclusion
Whilst developing for embedded does not require as much Rust language depth as other application areas, there are variations that are specific to embedded usage. These variations in several cases also have to do with how Rust has been adopted for safe operation. This includes the usage of methods like split() and constrain(). Setting out to learn embedded Rust, I found it a bit challenging to wrap my head around the need for split() and constrain(). In this blog post, hopefully, I manage to shed some light on these methods. What was your experience like? What were your challenges with embedded Rust? Share your thoughts in the comments 👇.